Welcome |
Video Manual |
Downloads |
Licence |
Live |
Regatta |
| Gpsar333 |
Analyses |
Replays |
Press |
Overwiew& Getting started | Install | Adding maps | Send results | Applet | Speed measurements | Deleting spikes | Apparent wind | VMG |
Adding maps in GpsActionReplay (since GPSAR 3.0)
(see below for previous releases)
As any GPS software, GpsAR enables background mapping in order so see where the action takes place. Any "jpg" file can be inserted in the main screen and will appear in a the background. However, this requires some calibration in order to have the map fitting its true position.
GpsActionReplay 3.0 introduces a new WYSIWYG tool that enables an accurate map calibration within seconds.
What is required?
You need a .jpg (or .jpeg) picture file (from a map or from a satellite picture). For this purpose, you can scan a map, or shot it with a digital cam (but this will result in some distortion in the corners), or make a screenshot from, for example, GoogleMap. You also need some reference points or trackfile in order to calibrate it.
Map creation procedure
Step 1 : loading some gpx data
- Load one or several tracks and/or waypoints located on the relevant zone. This is important for 2 reasons: you will need some reference (tracks and waypoints) to calibrate the map ; and loading this data before loading the jpg performs a focus on the relevant zone, so that calibration will be faster (the map will appear close to its final position).
Step 2 : loading a .jpg
- Go to File then Create a new map. Choose the relevant jpg in the browser. The map will then appear in the main screen calibrated so that it fits the maximum room.
- Check the waypoints checkbox to make waypoints appear on the screen.
Step 3: Calibrating
- It's time to calibrate. The principle is as follows: choose a point of the jpg, press simultaneously (and hold it pressed) SHIFT+CTRL while you perform a DRAG&DROP (click, and hold clicked, while moving the mouse) of the point. The map will be automaticly adjusted while moving the mouse so that the selected point follows the mouse.
- Perform this as many times as you wish, but theorically, you'll get a fully calibrated map with as little as two adjustments. Hence, if you've got two waypoints and know where they should be located on the map, you'll get it calibrated within seconds.
- Remember that you drag and drop a point of the map to a point a the space, not the contrary (this means that it's the map who moves, not the scene). For example, take a point of the map and move it toward a known waypoint.
 |
 |
  |
Step 4 : saving map(s)
- You just have to go to the File then Save maps menu to have all the maps stored in a .maps file.
- Important : the .jpg file and its associate .maps must be and remain in the same directory. This directory can be as you wish, but it is suggested you put all these files in the maps directory to prevent from any mistake.
- Important : if you've used previous releases of GPSAR (before 3.0), ERASE your old .maps files ! They are no longer compatible, and trying to use them would result in a bug.
Questions & Answers
What is a .maps file ?
- First of all, it's a simple text file which refers to one or more .jpg file(s) (just through their names), and describes how to calibrate them. Hence, you can edit them with a simple text editor.
- For each map referenced in this file, you will find the jpg file name, then the coordinates of two reference points in the bitmap, and then the coordinates of these two points in the real space (lat/lon). So, a calibrated map results in 9 lines in this file (one for the name, four for the two jpg points, four for the two space points).
- If a .maps file contains several calibrated maps, these maps will appear on the screen in the same order as in the text file. Hence, in case of overlapping, you can choose which map should be foreground or background just moving the order in the text file (select the 9 related lines, cut them, and paste them in the relevant place).
How to handle maps in GPSAR?
- Keep in mind the more you have maps loaded in GPSAR, the slower it will be. Consequently, you should load as few maps as possible at one time. To do this, you can use the "clear maps" menu when necessary, and then load or reload the relevant maps for the location you want.
- On the other hand, it's somehow fastidious to have to load maps each time you use GPSAR. Hence, GPSAR provides a special tip: the default.maps file located in the maps directory are automatically loaded when GPSAR is launched. So, it's recommanded that you put in it your 2 or 3 most used maps, so that you won't have to load any most of the time using GPSAR.
- A .maps file takes almost no room on your hard disk (at most 1 ko !), so you can make as many as you want. Hence, it is recommanded to make ONE .maps file for each .jpg (giving to the .maps file the same name as the associate jpg). Then you can make other .maps that group several .jpg (for example, for a given region). To do so, you only have to load some calibrated maps, and then save all them in a new .maps.
- Be carefull: if you save your maps in a .maps that still exists, this will erase and replace it (not adding).
- Don't forget to clear maps before calibrating a new one. Otherwise, you'll have several maps saved when you'll want to save your new one. however, it's sometimes interesting to have some other maps on the screen in order to calibrate the new one. In this case, no problem, do as you wish, save it all, and then edit the resulting .maps file and erase all maps but the new one.
Why this new calibration system is much more accurate ?
- It's more easy to know the position of particular points in the map than the two corner points of the map.
- But the real point is that this new calibration feature enables any rotation of the jpg, when previous releases kept the vertical and horizontal alignments unchanged. As you will see, most maps need some rotation to fit their actual position.
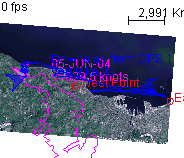
To finish, here are two examples of calibrated maps. One of them is "la rade de Cherbourg" (the biggest artificial one in the world). To calibrate it, I made two waypoints of particular place very easy to distinguish. It then took some seconds to have it calibrated. I must say that it wasn't possible to have an accurate calibration in previous releases of GPSAR since there is some rotation.
 |
 |
New since GPSAR 3.1 : Maps transparency
By default, a map appears in full color on the screen, and overlapping maps will result in the latest loaded being in the foreground. However, if you want to calibrate several maps and see how accurate it is, it's now possible to give a transparency factor so that make overlaping visible.
In the screenshot below, you can see for example 3 maps overlapping with a transparency factor of 50%
To do this, go to the Options menu, and set the maps transparency settings cursor.
This setting is usefull when calibrating a map using other ones, or to check it all. But it concerns all the maps simultaneously, and will be forgotten from one time to the other.
If you want a map to have a remanant transparency setting, whatever the main setting, and whenever it is loaded, you have to modify its .maps file. Just add a line after the jpg name (i.e. add line in second position) in the %value format. For instance, write %60 if you want your map to have a 60 percent transparency factor. See an example below:
Horst.jpg%60
[...]
Adding maps in previous releases of GpsActionReplay (before 3.0)
Adding a map:
To use your own map in GpsAR, you need to provide:
- The map screenshot in jpg (or jpeg) format
- The geographic coordinates of the corners of the map: the top-left point and the bottom-right point
- Latitude and longitude must be converted to Degrees. You must use a dot "." for the decimals. Hence, the general format of a value is dd.dddddd (the number of decimals is as you wish)
For example, here is a map that have been scanned, and then cut according to the Latitude/Longitude grid provided. Hence, we know exactly what the corners localisations are.
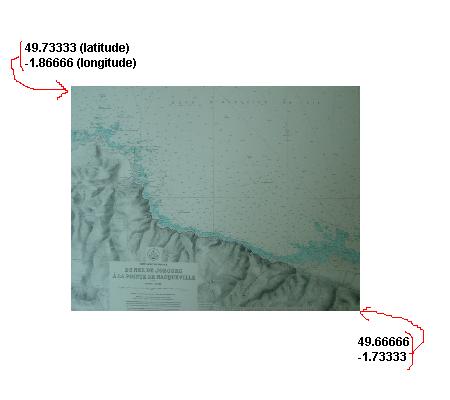
- We choose to save this file as hague6.jpg. (jpg is compulsary format)
- We put this file in the maps directory of distributionGPSAR
- We have now to edit the file default.maps with a text editor such as notepad (not a text processor as Word), and add five lines (the ones in the red box below):

hague6.jpg is the file name
49.73333 is the latitude in degrees of the top-left point
-1.86666 is the longitude in degrees of the top-left point
49.66666 is the latitude in degrees of the bottom-right point
-1.73333 is the longitude in degrees of the bottom-right point
Troubleshooting:
- You may have to use the minus "-", depending on you longitude and latitude. Don't forget it, if needed.
- You may have to do some conversion into degrees if your data are in degrees and minutes
- A minute is 1/60 degree.
- Look at an example: we have the 35°17' value to convert into degrees. 35 is yet in degrees, but 17 is in minutes = 35 degrees & 17 minutes = 35 degrees + 17.(1/60) degrees = 35 + (17/60) = 35.2833333, value to be entered into the .maps file.
- Be carefull with some Windows text editors than may add the .txt extention to your text file when saving it. If it is, click on the name to remove the .txt we need to get ridden of!
Default maps:
Since people generally use their GPS in the same place(s) most of the time, they generally need to upload the same maps, each time. In order not to have to do it explicitly each time you use GpsAR, it is possible to have one or several maps auto uploaded when launching GpsAR. These maps must be defined in the default.maps text file. It's what we've just done above as a demo...
Non-Default maps:
The other maps can be defined anywhere else, but you'll have to upload them explicitly when needed.
It's as you wish: choose your own(s) directory(ies) where to put some non default maps. For instance you can create the myNonDefaultMaps directory where you'll put some maps to be loaded. In this directory, put as many jpg files as you want. Then, create for instance a northWestFrance.maps file ("northWestFrance" is as you wish, but .maps extension is compulsary), where you'll write as many 5 lines as necessary, as we've just seen with the default.maps.
In fact, what is important is what is written in a .maps file. The directories organasation is as you prefer. For instance, you can put every jpg and every .maps in the same directory, including the default.maps. It will work in the same way: all maps defined in the default.maps of maps directory are automatically loaded, and others must be loaded via the menu.
To load non-default maps, go to File menu, and the choose load maps. Then browse and choose the relevant .maps file. For instance the northWestFrance.maps.
If you've loaded several maps and want to move to other maps, it's better you do Clear maps in File before processing. Otherwise, you would have too many maps in memory.
Why not to put all the maps in default.maps? Sure, you can. But be carefull, it implies memory and processing ressources. So, the best thing to do is to put from one to four maps in default.maps (depending on their size), and the others elsewhere.
Overwiew& Getting started | Install | Adding maps | Send results | Applet | Speed measurements | Deleting spikes | Apparent wind | VMG |